• Make
  • Cook
  • Read
  • Think
  • My Story

created for joy

~ make today

created for joy

Monthly Archives: April 2012

Ginger Scones and Two-Step Raspberry Jam

26 Thursday Apr 2012

Posted by createdforjoy in Cook

≈ Leave a comment

Tags

bake, butter, cook, cream, crystallized ginger, demerara, jam, quick, raspberry, scones, tea, vanilla sugar

gingerscone01

April offered up its last rebellious plunge into winter temperatures last week, the ideal time for a hot pot of tea and a batch of scones fresh from the oven. The routine of stirring and shaping, rolling and cutting is a comfort to me when the sky is gray and staying inside seems like a very good idea indeed. Like all good scones, these are plump and dimpled, with toasty brown tops and feather-light interiors. They get an extra bit of sweet heat from spicy crystallized ginger, just enough zing to keep them lively. I finish them with a bit of scone nirvana: a generous dollop of lightly whipped cream and a spoonful of jewel-tone raspberry jam.

I never lack the desire to make jam, but I often lack the patience. With a tray of scones baking and a pint of fragrant organic raspberries sitting on the counter, now is not the time for mason jars and pressure canners. This calls for a quick mash and stir, puddles of scarlet fruit and syrup: instant jam gratification. I am sure there are purists in both baking and preserving camps alike who would cry foul at the notion of a scone so messy that it requires a fork. I say, try it in all its melting, buttery, tangy-sweet glory, and then tell me you don’t want another. :)

gingerscone04

Ginger Scones and Two-Step Raspberry Jam
makes about 18 scones and a cup of jam

For scones:
3 3 /4 c. all-purpose flour (I use King Arthur)
1/4 tsp. salt
1/4 c. granulated sugar
3 Tbsp. baking powder
1/2 c. cold unsalted butter (1 stick), cut into small pieces
1/4 c. chopped crystallized ginger or ginger baking bits
1 1/4 c. milk
2 Tbsp. heavy cream or milk to brush on tops of scones and
1 Tbsp. demerara sugar for sprinkling

For jam:
1 pint fresh raspberries, preferably organic
1/3 c. granulated sugar or vanilla sugar (see these recipe notes for vanilla sugar how-to; taste your berries for sweetness and feel free to adjust the amount of sugar)

Oven 375F. In a large mixing bowl, whisk together the flour, salt, granulated sugar, and baking powder until well-combined. Using your hands, press and rub the cold butter into the dry ingredients until the mixture is uniform and transformed into sandy, crumbly bits of dough. Mix in the ginger, then add the milk and stir with a wooden spoon just until combined.

Turn the dough on to a lightly floured surface and knead 10-12 times to finish bringing it together. Press and shape into a disc about an inch thick and cut out scones with a 2-1/2″-diameter round cookie cutter or glass. Gently press the scraps together and cut again until all the dough is used. (A light hand is key here, or over-working the gluten in the flour will make the final scones tougher.) Place the scones on a lightly greased or parchment-lined cookie sheet. Brush the tops with cream and sprinkle with demerara sugar, then bake 15-20 minutes. Tops should be light golden brown, but still tender.

While the scones cook, make your jam. Two steps, as promised: mash the raspberries and sugar together in a small saucepan, then simmer over medium-low heat for 10-15 minutes. Your jam should still have bits of whole berry, and the liquid should be thick and syrupy. This is the sort of jam you apply with a spoon, not a knife.

In addition to jam, I like lightly whipped cream with mine, but you could also use a drizzle of creme fraiche or even a spoonful of double-thick clotted cream, if you’re lucky enough to have it. (I miss you, Devonshire!)

This scone recipe is adapted from one in Gale Gand’s cookbook Brunch!, as mentioned in the Pear and Marzipan Pastries post.

gingerscone02

Advertisement

Build

24 Tuesday Apr 2012

Posted by createdforjoy in Make

≈ Leave a comment

Tags

art, balsa wood, blue, build, collage, copper, finish, gears, green, hope, make, metal, multimedia, past, patina, rust, treasure, vintage, wire

build01

I got the very best birthday present this year: a passel of rusty old metal, courtesy of some dear friends and their 140-year old farm. There are nails and screws, washers and springs, hinges and handles, locks and keys: all lovingly hand-picked, colored by history in shades of deep orange and warm red. Who wants a pristine, shiny package when you can have a gift pulled from the clutches of spiders in the back of the barn? To some, all that rust may just seem like tetanus waiting to happen, but to me it is the sweetest kind of treasure.

Maybe I appreciate it all the more because I’m feeling a little bit vintage myself these days. I’m certainly showing some wear (I like to call it “patina”), but I still work hard and have some pretty good stories to tell. If there is beauty in being authentic, then all my creases and chipped edges make me positively radiant. :)

build04

It was that theme — the value in building a life with layers of wear and age — that inspired my most recent collage. I used my favorite hinge from my collection of vintage bits (yes, I have a favorite hinge) because its dusky blue reminded me of the sky in an old oil painting. I also picked out a few gears and some rusted nails to bundle in twine, then set to work assembling a multimedia landscape.

The background is a 5″x7″ watercolor illustration board painted to look like a piece of worn metal. This was the perfect opportunity to use Sophisticated Finishes, a liquid copper finish that can be custom-antiqued with a selection of blue and green patina solutions. It is little more than chemistry in action, but it gives me a thrill every time I watch a metallic surface fade and oxidize before my eyes.

build02

The paper pieces are from a 1952 travel magazine highlighting the charms of the midwestern United States, a great fit considering most of the vintage pieces I used hail from Kansas. I snipped and sanded a little balsa wood house, wallpapered with a page from an old hymnal, and set it against a fence made of sculpture wire. The final addition was a grove of stamped, embossed trees.

build03

There is such an obsession in our culture today with looking younger than we really are, smoothing out our wrinkles and blemishes until our faces have all the interest of a buffed wax floor. I am not sure how having the forehead of a 16-year-old became so important, but I think a society that values appearance above character has just hammered the perfect, shiny nails into its own coffin.

I value wisdom and experience, and that stuff usually comes with the price of aging. I would rather show and feel those years and know I really learned from them, than stay the unwrinkled, unknowing me I was a decade ago. I suppose that line of thinking also makes me sound increasingly vintage, but I don’t mind, because I’ve figured out how much promise that holds.

Spring Green Fritatta with Heirloom Tomato Salad

17 Tuesday Apr 2012

Posted by createdforjoy in Cook

≈ 1 Comment

Tags

brunch, cheese, cook, creme fraiche, dinner, eggs, fritatta, green onions, green peas, heirloom tomato, recipe, salad, scallions, spring, vegetarian, zucchini

springfritatta04

Thursday nights seem caught in perpetual dinnertime limbo. There are too many leftovers to make another elaborate meal, and the end of the work week is tantalizingly close. Thursdays require something simple and quick that makes use of the extras in the refrigerator, but still satisfying enough to fuel that last push toward the weekend. A little culinary immediate gratification is a welcome sight.

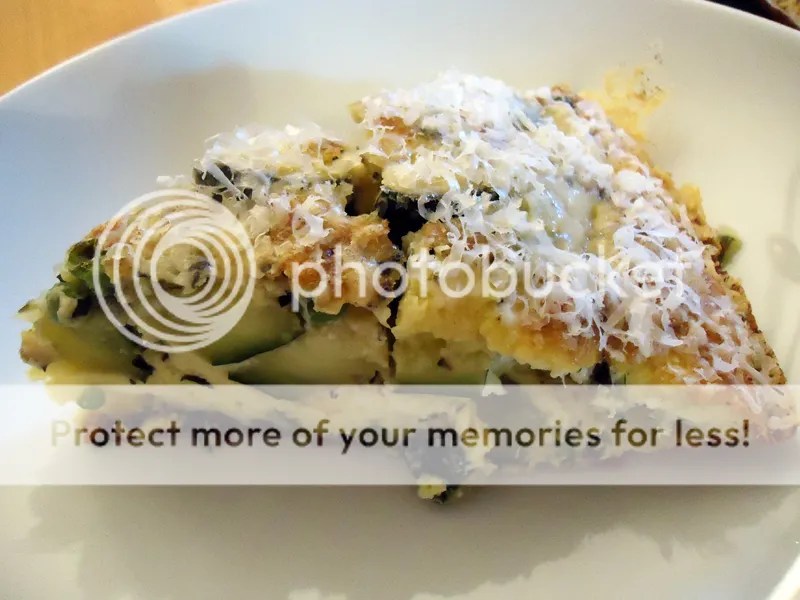
All of which makes Thursday nights the ideal time for a fritatta, a sort of hybrid omelette/crustless quiche. Golden, rich, and hearty, it is a dish that comes together quickly and allows for plenty of creative adaptation based on what’s available in the fridge and pantry. This one incorporates three of my seasonal favorites: the first fresh zucchini, bright green peas, and a few sprightly spring onions. Although I used parmesan, any cheese will do here, from mild, milky mozzarella to the nutty smokiness of Gruyere. I have to say, there is simple kitchen magic in topping a hot fritatta with a freshly grated flurry of parmesan snow, white and light, melting almost as soon as it touches the eggy surface.

This recipe is vegetarian, and for me, that healthy dose of nutritious green also feels like a good fit before the weekend begins. However, you could easily add a handful of cooked bacon or ham, if your carnivorous instincts demand satisfaction. The topping is a zingy, sweet-tart salad made of yellow heirloom tomatoes seasoned simply and generously with olive oil, vinegar, salt, pepper, and garlic. It brings a much-needed acid punch to the party, balancing out the richness of so much egg, cream, and cheese.

Feel free to substitute your own vegetable choices: mushrooms or potatoes in place of the zucchini; chard or spinach rather than green peas; diced red onion and bell pepper instead of scallions. You can also adjust the herbs; rosemary, tarragon, and dill all play beautifully with eggs and cheese. That is the beauty of a fritatta, so friendly and accommodating, spontaneous and undemanding: the perfect Thursday night dinner guest.

springfritatta02

Spring Green Fritatta with Heirloom Tomato Salad
makes eight generous wedges

For fritatta:
5 scallions or one large green onion, white bulb finely chopped and green tops thinly sliced
3 zucchini, preferably organic, chopped into bite-size chunks
1 c. cooked green peas (fresh or frozen, whatever you have on hand)
3 cloves garlic, minced
1 1/2 tsp. coarse sea or kosher salt
3/4 tsp. ground black pepper
1/8 tsp. freshly grated nutmeg
2 tsp. dried or 2 Tbsp. chopped fresh basil
1/2 tsp. dried or 1 tsp. fresh thyme
juice of half a lemon
2 Tbsp. olive oil
10 large eggs
1/2 c. creme fraiche, all-natural sour cream, or heavy cream
1/2 c. freshly grated parmesan (or other cheese of your choice) plus more for topping/serving

For tomato salad:
1 very large or two medium heirloom tomatoes, cut into bite-size chunks
1 clove garlic, minced
1/2-1 tsp. coarse sea or kosher salt (adjust amount to taste)
1/4 tsp. ground black pepper
sliced top of one green scallion
1/4 c. olive oil, preferably extra virgin
3 Tbsp. seasoned rice vinegar (if using unseasoned rice vinegar, add 1/2 tsp. granulated sugar to salad to balance tartness of vinegar and highlight natural sweetness of tomatoes)

Oven 450F. In large, nonstick sauté pan with curved sides, heat olive oil over medium-high heat. Add zucchini, onion, garlic, 1/2 teaspoon of the salt, and 1/4 teaspoon of the pepper, and cook until zucchini is tender but still crunchy in the center, about 7 minutes. Remove from heat and drain off extra liquid released from zucchini. Stir in lemon juice, nutmeg, herbs, and cooked peas.

While veggies are cooking, beat together eggs, creme fraiche (or dairy product of your choice), remaining teaspoon of salt, and remaining 1/2 teaspoon pepper in large mixing bowl. Whisk until mixture is creamy yellow and evenly combined. Stir in cheese.

Return pan of cooked veggies to medium-high heat and pour over egg mixture. Stir briefly, just enough to distribute veggies evenly in egg. Allow to cook on stovetop until edges are just set, a quick minute or two, then immediately transfer to oven. (Quick tip: if your pan has plastic handles, wrap them with a double layer of aluminum foil before baking.) Cook for 20-25 minutes, until center is set but not firm, and top is golden brown. Remove from oven and grate on more cheese as desired. Allow to cool 2-3 minutes, then gently slide fritatta out on to serving platter. (You may have to loosen the edges slightly before removing from pan — just arm yourself with a spatula and proceed confidently.)

While fritatta is baking, mix all tomato salad ingredients in a medium mixing bowl and toss well. Cover and allow to sit at room temperature until fritatta is ready. (Never purchase chilled tomatoes or store them in the refrigerator; refrigeration causes an immediate, permanent breakdown of the chemicals that give tomatoes flavor.) Taste once more for seasoning before serving.

To plate, slice warm fritatta into eighths and top each wedge with a generous spoonful of tomato salad. Serve with a chunk of crusty bread, preferably warmed and buttered, and enter Friday with a happy, full belly. :)

springfritatta05

Waxing poetic

15 Sunday Apr 2012

Posted by createdforjoy in Make

≈ Leave a comment

Tags

art, cardstock, collage, daisies, encaustic, grow, make, paint, paper, resin, trees, watercolor, wax

encausticgrowing04

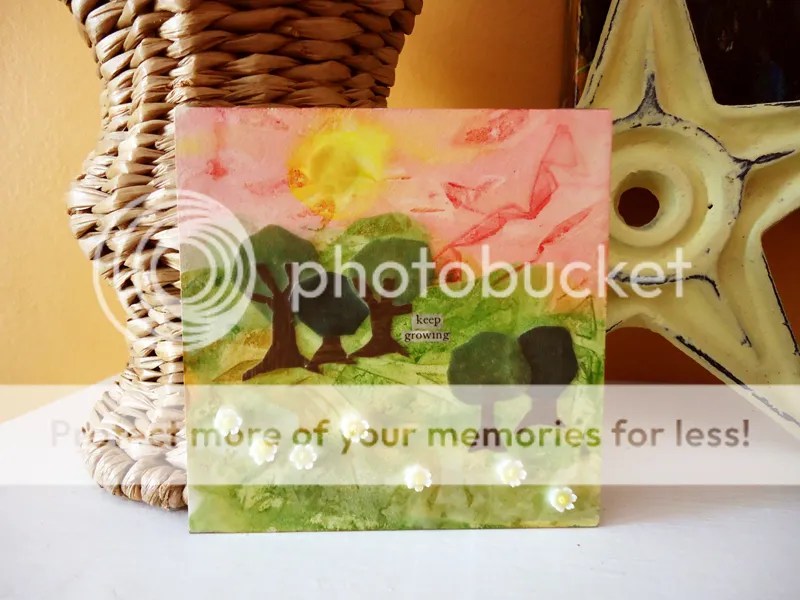
Okay, that’s the very last wax pun, I promise. :) I tried encaustics — the art of painting and collage with wax — for the first time a couple of months ago, and I was instantly hooked. I love the depth and texture added to paper and fabric by the waxy, slightly opaque layers of encaustic medium. As a collage enthusiast who owns at least two dozen types of adhesives ranging from hot glue to glaze, tacky tape to epoxy, I am also fascinated by the endless potential for embedding objects in and on beeswax.

March was a fruitful season of learning and growth for my family and I, but it wasn’t one that allowed for much time in the studio. I decided to celebrate my return with a second encaustic piece. As with my first, this one is on a 4″-square piece of watercolor paper mounted on masonite. I made the abstract pastoral background by applying wrinkled plastic wrap to still-wet watercolor washes to add texture and grain. I sketched and cut out a few small paper trees to give the scene a little more depth and detail, then added a bit of yellow patterned cardstock to the center of the sun.

encausticgrowing02

The final touch was tiny text that reads “keep growing,” snipped from the pages of a 1938 farming magazine. I painted on several coats of encaustic medium, warming the surface with a heat gun between each application to help fuse the layers. After applying the last, I floated a smattering of miniature resin daisies in the hot wax. I love how the liquid wax drifted up and around them, almost enveloping their delicate white petals.

I am already at work on a slightly larger scale encaustic piece, and this time I want to experiment more with achieving patterns in the wax. My studio smells musty and sweet, perfumed by watercolor and heated wax that seems faintly scented of honey. It is how I imagine the inside of a beehive must smell (don’t tell me otherwise — I like the romance), and it makes me feel inspired and busy. More to come!

encausticgrowing03

Plum Crumble

12 Thursday Apr 2012

Posted by createdforjoy in Cook

≈ 2 Comments

Tags

almond paste, bake, cinnamon sugar, cook, crumble, demerara, dessert, plum, stone fruit

plumcrumble01

It has been a whirlwind of activity around here, as multiple birthdays coincided with an extended visit from dear friends. Absorbing a family of six into your household can make for a wee bit of chaos, but it also makes for a whole lot of fun. A few minutes after they left, I found myself at a loss: standing in a suddenly empty kitchen, unsettled by the vacuum of quiet and stillness where so many people were talking and moving just minutes before.

The kitchen was the right place to be at that moment, really. It is where I feel most centered and fluent, the place where I seem to instinctively know what to do. In the wake of all that activity, I was in the mood to bake something tasty and simple. A bowl full of ripe red plums beckoned, and rolled oats and almond paste from the pantry supplied substance and richness.

I love the textures of this dessert: warm, syrupy plums and melted heaps of smooth, nutty almond paste, topped by the toasted crunch of oat crumble. A scoop of vanilla ice cream is virtually required for a fruit crumble fresh from the oven, although you could substitute lightly sweetened whipped cream or a drizzle of creme fraiche. Apricots or peaches would also work in place of the plums, or even a mix of stone fruit and berries. Just think sweet and tangy, ripe and seasonal. No matter the filling, this dish is warm and comforting, just right for a still April afternoon.

Plum Crumble
serves eight

For filling:
10 ripe red plums, pits removed and fruit cut into 1/8’s
2 tsp. cinnamon sugar
1/4 tsp. freshly ground nutmeg
1/4 tsp. salt
juice of half a lemon
7 oz. almond paste or marzipan

For crumble:
1/2 c. all-purpose flour
1/2 c. rolled oats (not instant)
1/4 c. demerara or turbinado sugar
1/2 tsp. salt
1/2 tsp. ground cinnamon
1/2 c. unsalted butter (1 stick), melted

Oven 400F. Place plums in a medium-size, buttered glass/ceramic baking dish. Sprinkle with cinnamon sugar, nutmeg, and salt, then drizzle with lemon juice. Pinch almond paste into hazelnut-size knobs and scatter across the top of the plums.

In a small mixing bowl, toss flour, oats, sugar, salt, cinnamon, and butter until well-combined and crumbly. Spoon evenly over the top of the fruit and bake for 30 minutes, until topping is golden brown and fruit filling is bubbly and tender. Serve hot, with something cold and creamy.

Banana Chocolate Chip Muffins

03 Tuesday Apr 2012

Posted by createdforjoy in Cook

≈ Leave a comment

Tags

bake, bake sale, banana, chocolate chips, cook, demerara, dessert, ginger, muffins, pumpkin

bananamuffins02

Happy National Bake Week! In the U.S., yesterday kicked off a week devoted to celebrating the art and science of baking, and I can’t imagine a better inspiration (read: excuse) for my own glut of baking blog posts. It’s also ideal timing considering my whole family’s birthdays fall in the next two weeks. If you are going to have four reminders of your ever-increasing age within ten days of each other, it’s best to have a lot of baked goods on hand. :)

We’ll ease into the baking frenzy with simple, friendly Banana Chocolate Chip Muffins. This is a great recipe to have on hand: unintimidating, quick, and tasty, with a classic flavor combination that suits a wide range of ages and palates. The pairing of ripe banana and whole wheat flour make for a substantial muffin that is still moist and tender, and they do double duty as a breakfast treat or a weeknight dessert. If you’re feeling spicy, add a handful of finely chopped crystallized ginger before baking, or stir in a cup of walnuts or pecans for some crunch. These muffins also work with pumpkin puree substituted in place of the mashed bananas.

Like all good banana bread, these are even better the day after they are baked. This makes them ideal for bake sales, or as a make-ahead for a special occasion later in the week. Surprise your neighbor, bake some for your co-workers, or take a dozen to a friend celebrating a birthday. (hint, hint ;)

bananamuffins03

Banana Chocolate Chip Muffins
makes 30 muffins

1 c. unsalted butter (2 sticks), softened
1 1/2 c. demerara or turbinado sugar (read these recipe notes for more info)
2 large eggs
1 tsp. ground cinnamon
1 tsp. ground allspice
1/4 tsp. freshly ground nutmeg
4 medium bananas, mashed (about 1 1/2 c.)
2/3 c. milk
2 c. white whole wheat flour (available from King Arthur, see recipe notes below)
2 c. all-purpose flour
3 tsp. baking powder
1 tsp. baking soda
1 tsp. salt (not coarse)
1 1/2 c. chocolate chips (I used mini’s)
optional: 1/2 c. finely chopped crystallized ginger or
1 c. chopped pecans or walnuts

Oven 350F. In medium mixing bowl, cream together the butter and sugar with an electric mixer until light and smooth. Scrape the sides of the bowl with a silicone spatula, and then beat in the eggs, spices, banana, and milk until uniformly combined. In a separate small mixing bowl, whisk together both types of flour and the baking powder, baking soda, and salt. Gently stir this dry mixture into the wet ingredients, just until combined. (If you over-mix here, your muffins will be tough and dry.) Fold in chocolate chips and any other add-ins you like.

Scoop the batter into a greased/paper-lined muffin tin so that each muffin cup is full (about 2 tablespoons of batter in each). Bake for 20-22 minutes, until tops are lightly golden brown and a toothpick inserted in the center of a muffin comes out clean. Remove from oven and let cool ten minutes, then remove muffins from pan and allow to cool completely on baking rack. (If you cool on a plate or other solid surface, the bottoms will steam and get soggy.) These are lovely spread with a little cream cheese.

Recipe Notes + Tips:
I love the extra fiber and vitamins that come from using whole grain flour in baked goods, but not the unappealing, leaden texture that often follows. It is one thing to have a satisfyingly weighty loaf of whole wheat bread; it’s quite another to have a chocolate cupcake that could double as a doorstop.

One of the ways I have found around that conundrum is King Arthur Flour’s white whole wheat flour. Made from hard white spring wheat instead of traditional red wheat, it retains the nutritional content of other whole wheat flours, but with a lighter color, texture, and flavor. While most people can detect the appearance and taste of whole wheat flour, I find the white whole wheat is much less noticeable. I have used it with success in everything from cinnamon applesauce cake to pumpkin bread, and I especially enjoy the chewy texture it lends to these Banana Chocolate Chip Muffins.

I have found KAF white whole wheat flour for sale at multiple grocery stores in my area, but you can also order it on-line. If you don’t have any on hand, you can use traditional whole wheat flour in the recipe above, with the end result a more dense muffin. If you prefer to keep the crumb lighter, decrease the whole wheat flour to one cup and increase the all-purpose to three cups.

bananamuffins01

Follow created for joy on WordPress.com

Enter your email address to follow this blog and receive notifications of new posts by email.

Search

Recent Posts

  • Almond Butter and Jam Cookie Sandwiches
  • Bacon and Egg Breakfast Muffins
  • Loving the Kitchen
  • Creamy Chicken Noodles
  • Double Chip Molasses Oatmeal Cookies

Categories

  • Cook (48)
  • Easy-Peasy (3)
  • Make (37)
  • Read (24)
  • Think (20)

Archives

  • October 2013 (1)
  • March 2013 (1)
  • October 2012 (1)
  • August 2012 (6)
  • July 2012 (4)
  • June 2012 (7)
  • May 2012 (4)
  • April 2012 (6)
  • March 2012 (6)
  • February 2012 (9)
  • January 2012 (14)
  • December 2011 (15)
  • November 2011 (17)
  • October 2011 (6)

All original content © Spring Barnickle, Create Joy LLC, & createdforjoy.com, 2011-2014.

Feel free to link to createdforjoy.com or provide excerpts with clear credit and directions to original content; please ask before copying posts or pictures to your site or publication.

Create a free website or blog at WordPress.com.

Privacy & Cookies: This site uses cookies. By continuing to use this website, you agree to their use.
To find out more, including how to control cookies, see here: Cookie Policy
  • Follow Following
    • created for joy
    • Join 96 other followers
    • Already have a WordPress.com account? Log in now.
    • created for joy
    • Customize
    • Follow Following
    • Sign up
    • Log in
    • Report this content
    • View site in Reader
    • Manage subscriptions
    • Collapse this bar